
Most private label power tool brands die within 18 months. Not because the market is too crowded—trust me, there’s room for quality brands—but because the founders got burned before they ever reached a customer.
I’ve been on the factory floor in Wuxi for over 15 years. I’ve watched 100+ brands launch their first SKU, and I’ve watched at least half of them stumble on the same avoidable mistakes: picking a factory that subcontracts everything, skipping third-party inspections, or realizing too late that their “18V platform” can’t actually power the circular saw they want to launch next season.
This guide is the walkthrough I give to serious buyers when they visit our facility. It’s not a high-level business plan. It’s the actual sequence of what you need to do, in what order, with the costs and pitfalls that most “how to start a brand” articles skip entirely.
If you’re serious about building a real brand—not just slapping a logo on a generic drill and hoping Amazon FBA does the rest—read on.
What “Private Label Power Tools” Actually Means
Let’s clear up the confusion first, because the terminology gets abused constantly.
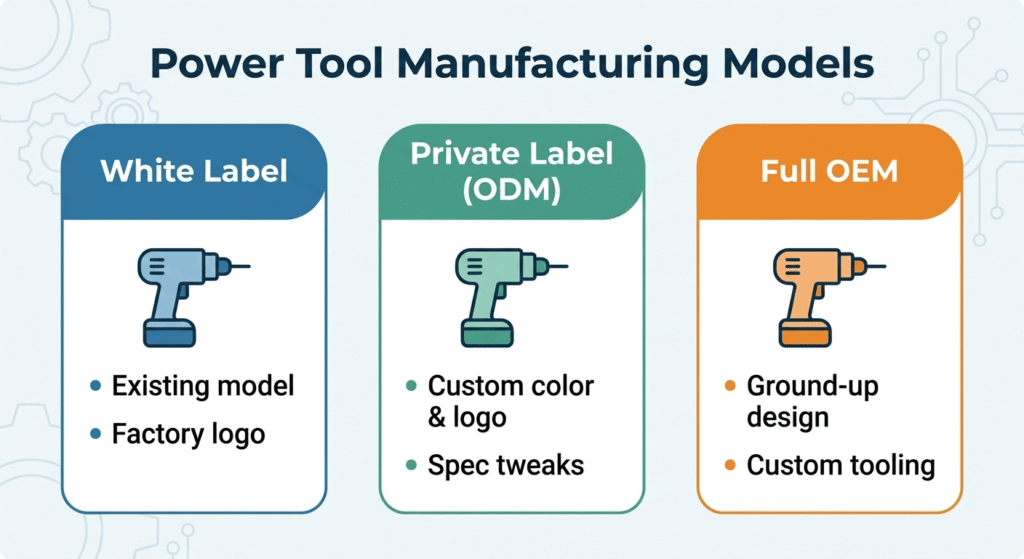
White label = you buy a factory’s existing model, put your sticker on the box, and sell it. Zero modifications. Your “brand” is just a logo on someone else’s product.
Private label (ODM) = you take a factory’s existing tool platform and customize it. Different color, your branding on the housing, custom packaging, maybe a few spec tweaks (higher torque, different chuck, softer grip). This is where most successful tool brands start.
Full OEM = you design the tool from scratch. Custom motor, custom housing, custom everything. You’re essentially hiring a factory to build your product. This is expensive ($50k–200k+ in tooling and R&D) and usually not where you should start.
For power tools specifically, there’s an extra layer most guides ignore: the battery platform. If you launch a drill, an impact driver, and a circular saw, they need to share the same battery system. That’s not just a nice-to-have—it’s the difference between a brand customers adopt and a brand they ignore.
I’ve seen brands launch four SKUs on three different battery platforms because they sourced from three different factories. The result? Customers buy one tool, realize the battery doesn’t work with anything else, and return everything.
Step 1: Define Your Niche and Battery Platform Strategy
Before you talk to a single factory, you need to answer two questions precisely:
1. Who is your customer?
- DIY hobbyists buying their first drill at Home Depot? (High volume, low margin, intense competition)
- Professional contractors who need tools that survive a job site? (Lower volume, higher margin, loyalty-driven)
- A specific trade—plumbers, electricians, HVAC? (Niche, highly loyal, easier to dominate)
2. What battery platform will you commit to?
This is the most important decision you’ll make, and most new brands get it wrong. Once you choose a platform—18V, 20V MAX, or 40V—you’re locked in. Every SKU you add for the next five years needs to run on that same battery.
At Bocon, we work with brands that thought they could “figure it out later.” Two years in, they want to add a new SKU but their original battery supplier has moved on to a new cell format. Now they’re redesigning their entire lineup.
Insider tip: Start with 1–2 SKUs maximum. A drill/driver combo is the most proven entry point. If those sell, expand outward along the battery platform. If you can’t make a drill profitable, adding a circular saw won’t save you.
Realistic scope for a first launch:
- 1–2 SKUs (drill + impact driver is the most common combo)
- One battery platform (18V/20V is the industry standard)
- 500–1,000 units per SKU as initial order quantity
Step 2: Find the Right Factory Partner (Not Just Any Factory)
This is where brands live or die. I’m going to be blunt: 70% of the “manufacturers” you’ll find on Alibaba are trading companies. They don’t own a factory. They don’t have engineers. They’re middlemen who will subcontract your order to the lowest bidder—often a factory they’ve never visited.
Here’s how to tell the difference:
| Red Flag | What It Means |
|---|---|
| Based in Shenzhen, Guangzhou, or Shanghai | These are trading hubs, not manufacturing cities. A real power tools factory is in Yongkang (Zhejiang), Suzhou, or Wuxi. |
| Product catalog has 200+ unrelated items | No factory makes everything from angle grinders to cordless screwdrivers to chain saws. Narrow specialization is a good sign. |
| No motor production in-house | The motor is the heart of a power tool. If they buy motors from a third party, they can’t control quality or cost. |
| Won’t do a video call on the production floor | Walk away. If they have a factory, they’ll show it to you. |
| Can’t explain the difference between brushed and brushless motors | They’re not a manufacturer. They’re a reseller. |
What to look for instead:
- ISO 9001 certification (ask for the certificate, then verify it on the issuing body’s website)
- In-house motor production or at minimum in-house winding
- A testing lab on premises (torque testers, battery cycle testers, drop test equipment)
- Willingness to let you visit and audit the facility
- Existing OEM/ODM clients they can reference (anonymized is fine)
The battery question: If you’re launching a cordless brand, the battery is 40% of your cost and 80% of your warranty claims. Ask any potential factory: “Do you make your own battery packs, or buy them?” If they buy them, ask who their battery cell supplier is. Samsung, LG, or Panasonic cells = good. No-name Chinese cells with no spec sheet = walk away.
We’ve had brands come to Bocon after their first supplier’s battery packs started swelling within six months. Replacing 500 battery packs under warranty costs more than the profit on the entire first order.
Initial factory audit checklist:
- [ ] ISO 9001 or equivalent quality certification verified
- [ ] Motor production in-house (or documented supplier relationship)
- [ ] Battery cell source identified and verified (Samsung/LG/Panasonic preferred)
- [ ] Testing equipment visible on factory floor
- [ ] Minimum 3 reference clients (anonymized OK)
- [ ] Willing to sign NNN agreement (Non-Disclosure, Non-Use, Non-Circumvention)
Step 3: Prototyping and the “Golden Sample” Process
Once you’ve selected a factory, don’t rush to place a production order. The prototyping phase is where you find out if this partnership is going to work.
What to specify in your RFQ (Request for Quotation): Most buyers send factories a message saying “send me a sample of your 18V drill.” That’s not enough. A proper RFQ includes:
- Target torque (N·m) for drill and impact mode
- Desired chuck type and size (keyless, 10mm or 13mm)
- Battery specs (AH rating, cell brand)
- Housing color and branding placement
- Packaging requirements
- Target price range (so they don’t spec a $50 tool when you need a $25 COGS)
The Golden Sample system:
This is the most underestimated part of private label. After you approve the prototype, you and the factory each keep an identical “golden sample,” sealed and documented. Every production unit is measured against it.
Here’s what most brands don’t know: you need three golden samples.
- One for you (kept in your office)
- One for the factory (locked in their QC office)
- One for the third-party inspector (used during pre-shipment inspection)
If you only have one and it gets lost or damaged, you have no reference point for quality disputes.
Sample costs for power tools:
- Existing model with minor branding: $50–150 per unit (you usually pay for shipping via DHL/FedEx, ~$30–80)
- Modified sample with spec changes: $150–400 per unit
- Full custom prototype: $500–2,000+ depending on tooling required
Insider warning: If a factory’s sample performs significantly better than the spec sheet they quoted you, ask questions. I’ve seen factories hand-build samples with premium components, then switch to lower-grade parts for production. The defense: “Oh, that sample used Samsung cells. Production uses Chinese cells to meet your target price.” Get the cell specification in writing before you pay for the sample.

Step 4: Certifications and Compliance (The Expensive Maze)
You can’t sell power tools in the US, EU, or Australia without proper certifications. And here’s the part most guides won’t tell you: the factory’s existing certificate doesn’t cover YOUR product if you’ve made any modifications.
| Market | Required Certifications | Typical Cost | Timeline |
|---|---|---|---|
| United States | UL 60745 (hand-held motor-operated electric tools) OR ETL, FCC (for brushless motor controllers) | $8,000–15,000 | 8–12 weeks |
| European Union | CE (EMC+LVD directives), RoHS, REACH | $3,000–6,000 (if using an existing certified model, sometimes $0–1,500) | 4–6 weeks |
| Australia/New Zealand | RCM (requires CE or equivalent first) | $2,000–4,000 additional | 4–6 weeks |
| Battery packs | UN38.3 (mandatory for air/sea transport) | Usually included by battery supplier | 2–3 weeks |
The fake certificate problem:
I’ve seen brands get burned by “CE certificates” issued by random Chinese testing labs that no one in Europe recognizes. A real CE mark for power tools requires a notified body—TÜV, SGS, Intertek, or an EU-based testing lab. If your factory shows you a certificate with Chinese characters all over it and no EU notified body logo, it’s worthless in Europe.
Another trap: Some factories will tell you “we have CE, you can use our certificate number.” That’s only true if your product is identical to theirs. Different housing color? Different motor spec? Different battery? New certificate required.
Pro tip: Ask your factory which certification lab they use, then call the lab to verify the certificate number and scope. I’ve seen fake PDF certificates that look real until you actually call SGS.
Battery certification is non-negotiable: If your tool uses Li-ion batteries, UN38.3 certification is required for shipping—by air OR sea. No UN38.3 = your batteries don’t ship. Period. Make sure your factory’s battery supplier has this certification current (it expires and needs renewal).
Step 5: Branding, Packaging, and What Actually Distinguishes You
Most new brands obsess over the tool and neglect the packaging. Then they get 500 units delivered in boxes that fall apart in Amazon’s warehouse.
What actually matters to the end user:
The tool itself is table stakes. Where brands win or lose is:
- The case / tool bag. Is it actually usable, or cheap nylon that tears in a month?
- The instruction manual. Is it legible, with real safety information? (Also a certification requirement.)
- The insert card. A simple “register your tool for extended warranty” card with a QR code can build an email list of your customers—not the factory’s, not Amazon’s.
- The cardboard box. 5-ply corrugated minimum for cordless tools. They’re heavy and the boxes take abuse.
Packaging spec checklist:
- [ ] Box material: 5-ply corrugated (not 3-ply)
- [ ] Print quality: at least 4-color process, matte or gloss lamination
- [ ] Insert tray: EPE foam (better than cardboard inserts for protecting the tool)
- [ ] Product label: includes model number, voltage, AH rating, and “Made in China” (required for US imports)
- [ ] Manual: 16+ languages including the language of your target market, with proper safety symbols
Branding files your factory needs:
- Logo in vector format (AI, EPS, or SVG—not a JPEG)
- Pantone color codes for your brand colors (not just “dark blue”—specify Pantone 286C)
- Placement spec: logo on housing, on battery pack, on box, on manual
Insider tip: Spend the extra $0.50 per unit on a decent tool bag. A drill in a crushed box with no bag gets returned at a 15% higher rate than the same drill in a branded nylon bag. The bag also goes on to a job site, advertising your brand every day. Cheap packaging is a false economy.
Step 6: Production, QC, and Third-Party Inspection
You’ve approved the golden sample, signed the contract, and paid the 30% deposit. Now comes the part where things can go sideways.
The production timeline for power tools:
- Material sourcing: 7–10 days (if batteries are custom, add 10–15 days)
- Production: 15–25 days depending on order size
- Packaging production: runs parallel, 10–15 days
- Final assembly + packing: 3–5 days
Why you need third-party inspection:
Every factory says “we have our own QC department.” Sure. And every factory’s QC department reports to the production manager, whose bonus depends on shipping your order on time. Guess whose interests they prioritize?
You need an independent inspection. The industry standard is AQL 1.5–2.5 (Acceptable Quality Limit). That means if the inspector randomly samples your 500 units and finds more than 2.5% defective, the entire shipment gets rejected.
Inspection schedule:
- DPI (During Production Inspection) at 20–30% completion: catches component issues early
- PSI (Pre-Shipment Inspection) at 80% completion: final quality gate before you pay the balance
Cost: ~$300–500 per inspection. Worth every penny. I’ve seen brands skip this to “save money” and end up with 300 units that have reversed polarity on the battery connector. That’s a fire hazard and a total loss.
What to include in your QC checklist:
- [ ] Torque test (actual N·m vs. spec)
- [ ] No-load RPM test
- [ ] Battery fit: slides in smoothly, locks with click
- [ ] Charger: actual charge time vs. claimed
- [ ] Drop test: 1-meter drop onto concrete, tool still functions
- [ ] Packaging: no shipping damage in 10-sample drop test
Step 7: Shipping, Import, and the Battery Problem
Power tools with Li-ion batteries face shipping restrictions that most new brands don’t know about until it’s too late.
If your shipment includes loose Li-ion batteries or battery packs:
You need:
- UN38.3 certification (from the battery manufacturer)
- MSDS (Material Safety Data Sheet)
- Proper labeling on each battery pack
- A freight forwarder experienced with DG (Dangerous Goods) cargo
Shipping options:
| Method | Cost (500 units, 2–3 pallets) | Transit Time | Use When |
|---|---|---|---|
| Air freight (DG approved) | $800–1,500 | 5–10 days | Launch urgency, small batch |
| Sea freight (FCL/LCL) | $300–600 | 30–45 days | Restocking, large volumes |
US import specifics:
- HS code for power tools: usually 8467.21–29 (verify with your customs broker)
- “Made in China” must appear on every unit AND the packaging
- Section 301 tariffs: currently 25% on many power tools from China (check the latest HTSUS rates)
- Use a customs broker. Don’t try to clear this yourself.
Insider tip: If you’re launching on Amazon FBA, ship your first 200 units by air to start sales, then bring the rest by sea. This “hybrid shipping” strategy is what most successful brands use. Start with one pallet by air, not the entire first order.
Step 8: Launch and Distribution Strategy
You have product in your warehouse (or Amazon’s warehouse). Now what?
The mistake most brands make: they launch with 5 SKUs, spread their marketing budget across all of them, and none of them gain traction.
What actually works:
- Launch ONE SKU first. Make it the hero product.
- Get 10–20 verified reviews before expanding the line.
- Use the drill (everyone needs one) as your loss leader to get customers into your ecosystem.
- Once they have your battery platform, the second SKU is an easy upsell.
Distribution channels that work for power tools:
- Amazon FBA: highest volume, fiere competition, requires excellent photos and A+ content
- Home improvement retailers (Lowe’s, Menards, regional chains): high barrier to entry, but huge volume if you get on shelf
- Direct-to-consumer (your own Shopify site): highest margin, requires real marketing effort
- Pro distributors: selling through tool distributors who serve contractors. Lower volume per customer, but much higher loyalty.
After-sales is where brands fail:
Power tools break. Batteries degrade. Chargers fail. If you don’t have a plan for warranty claims, you’ll get destroyed by negative reviews.
Minimum after-sales setup:
- Spare parts inventory: 3–5% of your shipped units (batteries, chargers, keyless chucks)
- Warranty period: industry standard is 2–3 years for the tool, 1 year for the battery
- RMA process: can a customer get a replacement battery in 7 days? If not, you’ll lose them.
Insider warning: Most factories in China provide zero after-sales support to your customers. That’s your job as the brand owner. Make sure you stock spare parts before you ship your first unit.
Common Mistakes That Kill New Tool Brands
I’ve watched brands fail. Here are the mistakes I see repeatedly:
1. Choosing the cheapest factory. The $2/unit savings on a 500-unit order disappears the moment you have to replace 50 defective units. Cheap factories use cheap bearings, cheap brushes (on brushed motors), and unbranded cells. The failure rate shows up at month 6—right after your warranty claims start.
2. No battery platform strategy. Launching a drill on one battery system and the circular saw on another is the fastest way to confuse your customers and kill repeat purchases.
3. Skipping third-party inspection. I’ve said it twice already. It’s that important. $300 inspection prevents $5,000 in returns.
4. Underestimating certification costs. If you didn’t budget $8,000–15,000 for US certification, you’re not ready to sell in the American market. Factor this in before you place your first order.
5. Launching too many SKUs. I’ve seen brands launch 6 SKUs at once with a $10,000 marketing budget. That’s $1,600 per SKU. Not enough to gain traction on anything. Launch one SKU with $10,000 behind it, then expand.
6. Ignoring the competition’s review complaints. Read the 3-star reviews of your top 3 competitors. Whatever they’re complaining about—battery life, case quality, instruction clarity—make sure your product addresses it. This is the cheapest market research you’ll ever do.
Realistic Timeline and Budget
Timeline from “I have an idea” to “product is for sale”:
| Phase | Duration | What You’re Doing |
|---|---|---|
| Factory selection + sampling | 4–6 weeks | RFQs, sample evaluation, factory audit |
| Certifications | 8–12 weeks (can run parallel to production) | UL/CE testing |
| Production | 4–6 weeks | After deposit is paid |
| Shipping (sea) | 4–6 weeks | Ocean freight + customs clearance |
| Amazon listing + launch | 2–3 weeks | Photography, listing optimization, PPC setup |
| Total (sea freight) | 20–28 weeks | ~6–7 months |
| Total (air launch) | 16–20 weeks | ~4–5 months |
Budget for a proper launch (500 units, 1 SKU):
| Item | Low End | High End |
|---|---|---|
| Factory tooling / mold fees | $0 | $3,000 |
| Product cost (500 units) | $4,000 | $8,000 |
| Certifications (UL or CE) | $3,000 | $15,000 |
| Packaging (custom boxes/bags) | $500 | $1,500 |
| Third-party inspections (2x) | $600 | $800 |
| Shipping + import duties | $800 | $2,500 |
| Product photography | $300 | $1,000 |
| Initial marketing / PPC | $2,000 | $5,000 |
| Total | $10,700 | $36,800 |
The wide range reflects whether you’re doing a basic private label (using the factory’s existing certified model) vs. a full custom design with new certifications.
Conclusion: This Is a Marathon, Not a Sprint
Starting a private label power tools brand is one of the most capital-intensive paths in ecommerce. You’re not drop-shipping $20 gadgets. You’re building a brand with real products, real warranties, and real safety responsibilities.
But done right, it’s also one of the most rewarding. When a professional contractor tells you your drill out-performs a DeWalt or a Makita on the job site, that’s a brand moat you can’t buy with advertising.
The three things that matter most:
- Pick the right factory partner. Visit them if you can. Audit them if you can’t. Don’t trust a website.
- Respect the certification process. It’s expensive and slow, but it’s the law.
- Think in platforms, not products. Your first drill is just the entry point. The real money is in the battery ecosystem.
If you’re serious about launching and want to talk through your specific situation, we work with new brands regularly at www.oemcordlesstools.com. No hard sell—just a conversation with someone who has been on the factory floor for 15+ years and has seen what works and what doesn’t.